B.H.—October 2, 2015✓ Verified purchase
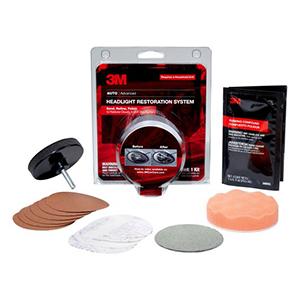
It took me awhile to get around to using this, but I finally got it done last weekend. This exceeded my expectations. Took me about 40 minutes to do both headlights on my SUV. Final results are excellent. They look brand new, bright and crystal clear. I had my doubts as I was doing it, but sure enough in the final step they buffed out clear. It has been a week since I completed it, so I can't comment on how they hold up over time, but I can't see why they wouldn't. The lenses on my SUV were half fogged up, mainly the upper half that gets exposed to the sun, so they weren't horrible from the start. But the headlight lenses are over 13 years old. The SUV has 220,000 miles on it, so I didn't feel like buying a whole new headlight housing. The housings are actually pretty cheap ($40 each if I recall), but sometimes the installation of the housing is a pain in the butt if you can't easily access every bolt. Thus, I wanted to give this a try. In this kit they give you multiple disks of the 500 and 800 grit. Then one of 3000 and one buffer pad. I only used one of the 500 and 800, which did both headlights. I wiped off the lens and pad every couple minutes to avoid build-up. I also didn't go full speed with the drill to avoid having the plastic head up (maybe half speed). I bet there's enough disks left over to do another 5 sets of headlights. So I wouldn't worry about running out. I used my electric drill at home, which didn't even use up a full charge on the battery. I took my time, mostly to be careful. The instructions say to go over the lens 6-8 times with each grit paper, but I bet I only did 4. Seemed like plenty. Also, it recommends to put masking tape around the molding surrounding the light to protect it. I put two layers and due to being sloppy I went off the lens and hit the tape. It sanded right through it and put a small scratch in the molding. After that I put a layer of duck tape on top of the masking tape. It was much more durable and didn't lead to any more scratches. It was so easy and the results so go, I'll probably go do my mother's car for her. Her car is newer than mine, yet for some reason more fogged up than my own. Read more
John—March 13, 2026✓ Verified purchase
This kit really works! All you need is a hand drill. Took me about an hour to clear up severely yellowed headlight covers on 21 year old Honda Pilot. Now it’s safe to drive my car at night. Read more
PG—January 4, 2026✓ Verified purchase
Product works great, requires patients and some skill/common sense. Follow the instructions to the letter and read some 4 star reviews on how to get good results. Expect to spend 1 hour per light. Alternative is buy new aftermarket lights total $100 for my 2005 Honda Pilot. I used a 3M restore kit March 2019. Came out great but was manually sanding for an hour per light. My drill at 0-1500 RPM worked fine and was much easier than hand sanding. My takeaway: 1. My drill with variable speed 0-1500 RPM helps keep pad more manageable 2. Follow the instructions to the letter, 2 layers of tape to protect car, more sanding per step is recommended/needed 3. Whip off light and sanding pad/disk often 4. Most important, steps 10-13 on instructions - Spray water on lens and gray pad often to keep it wet, wipe and spray water again, helps remove film and small scratches from white sand paper, spray again to see what you missed 5. Buff using orange pad to get clean/clear lens The reason for 4 stars is that the 3M kit in 2019 came with a clear lacquer that may extend the light from yellowing but was not easy to apply with an applicator (not a spray). So I applied Canuba wax to protect it for 6 months. I expect another 5 years till yellowing. Time will tell. Read more
Jodi Dibble—February 26, 2016✓ Verified purchase
BACKGROUND: I'm working on a 2002 Toyota Echo, original headlamps (never really restored) with the original UV shield "intact" (albeit useless). It's been sitting in the California sun its entire life, so you can imagine the state these headlights are in! As with most modern vehicles, my headlight lenses are made of plastic, not glass. Plastic discolors and hazes over due to many effects, although the most common one is simple oxidation. Oxidation is catalyzed (made to happen more frequently) by the presence of UV sunlight. Hence, all headlights made of plastic also ship from the factory with a baked-in UV protectant layer. I'd previously tried a combination polisher/sealant from Turtle Wax. However, while that made the lamps moderately more "clear", the haze returned less than 24 hours later. As a result, I can't recommend a chemical-based (deoxidizing) or polish-only solution to this problem. Enter 3M. USE: Summary: Very easy to use, and instructions included are very explicit. Essentially, this has you sand off and out any minor imperfections and (importantly) the factory-installed UV shield from your existing lens (the UV shielding is no longer effective, which is why you have hazy yellow lenses now ...). First, start with clean lenses. Bug guts and dust are just going to clog up those 500-grit sandpaper disks. Easier to wash them off than sand them off. Before doing anything else, of course you need to protect the paint around your lights (in my case, I opened the hood to get that out of the way, and used two layers of blue painter's masking tape to cover the paint and bumper adjacent to the other two sides of the lens. Note that you are not protecting the paint from chemicals, but rather from abrasion. As a result, you want tap which will stand up to sand paper, not necessarily super waterproof tape. Simple masking tape works just find for this purpose, and comes off cleanly. Once that setup is complete, you start with a 500-grit sandpaper, then progress to 800-grit, then 3000-grit foam. At that stage, if you rinse the lens off with water you will see fairly clear lenses again, but you are not done yet. Next, apply rubbing compound to polish out the last micro scratches left by the 300 grit sandpaper, rinse, and buff. Importantly, while this kit includes plenty of rubbing compound, it does not contain any sealant. Sealing the lenses keeps them from oxidizing in the sun, and ensures that the clarity you've just worked hard at attaining lasts more than a few weeks! I used a bottle of Blue Magic Sealer (http://www.amazon.com/gp/product/B0051PJWQW?psc=1&redirect=true&ref_=od_aui_detailpages00) for this purpose. Just a couple of sprays on the lens, then wipe across and let dry. Once dry, a little buffing removed any final inconsistencies. For me, I started off using my hand driver instead of plug-in drill. This hits the bottom range of suggested RPMs. However, I found that the sanding process would often end with the driver veering out of control (not a major issue; just take finger off the trigger, re-steady, and go again). Eventually I switched from that driver to my full plug-in drill (hits the high end of RPMs); this was MUCH easier at the higher range of rotations. So, I'd strongly advise using a drill with the highest RPM rating possible here. RESULTS: Amazingly clear headlight lenses! In about an hour of work (probably took longer than it would have otherwise but I wanted to make sure I didn't skip any of the steps), I went from almost-opaque "lenses" that let through depressingly little light to super-clear lenses letting out clear and bright beams of light. Results look amazing, and as an added bonus are much safer for you (brighter illumination from your headlights) and other drivers (less refracted glare). ANY SUGGESTIONS? The core of this is some very expensive sandpaper, and two non-consumables (the drill attachment and a foam polishing pad). Sandpaper can be gotten much cheaper, albeit without the "velcro" backing; look for "wet-dry" sandpaper in the 400-500 grit range for "cutting", the 800-1000 grit range for smoothing, and in the 3000+ grit range for initial polishing. The main trick then is cutting to size/shape and attaching to the drill attachment. RECOMMEND? Absolutely. Tomorrow I'll be doing the same to my wife's 2004 GMC van. I will be trying the replacement-sandpaper approach there for the 800 grit at least. Read more