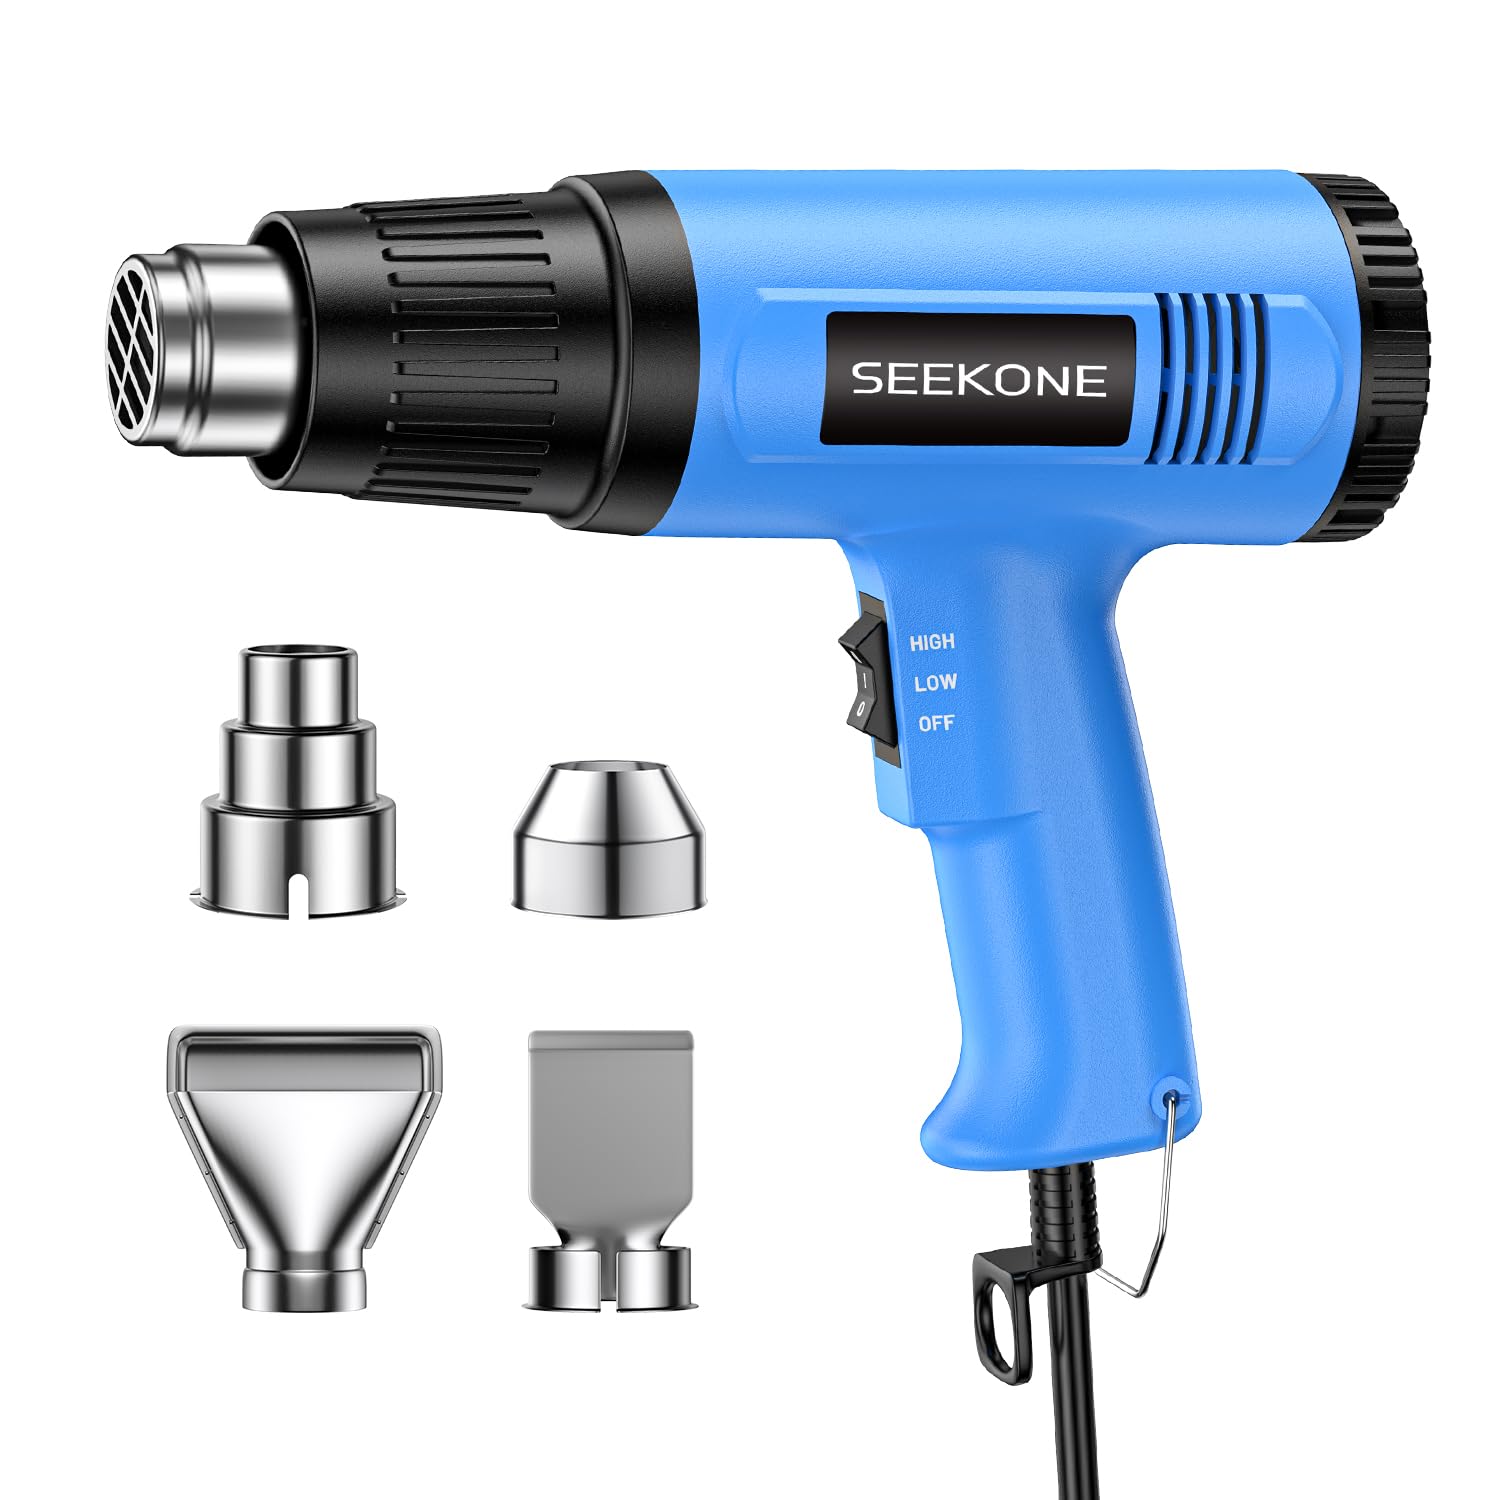
I use heat guns quite often, mostly for applying heat-shrink tubing, and bending PVC tubing and pipe. For these applications, I have a couple professional heat guns by Milwaukee, with accurate digitally controlled fan speed and heat control that can be variably set and then the gun adjusts to maintain the setting. But those cost a few hundred dollars, and I wanted a couple inexpensive basic heat guns for my home shop and garage. I decided upon two different models by Seekone, a less expensive one with simple thermostatic control, and a somewhat more expensive (yet still inexpensive) model that is the subject of this review, which adds a digital temperature readout and solid-state setting of fan speed and temperature. So, about this fancier model (see my other review of the basic model). It is a classic utilitarian device with a solid, decent quality appearance and feel. It seems like something that will hold up well to light use, but I don't know if I would either trust it for any kind of production level work, or to last for many years of regular use. The housing is all plastic, with practically the only metal visible being the hot air nozzle, which by the way is approximately 1-1/2" diameter. The housing from the rear/base to the end of the nozzle is about 9-3/4", the diameter of the body is about 2-3/4", and the handle (including the power cord strain relief) extends about 7" below the body of the gun. The heavy duty power cord is about 56" long, and its strain relief included a loop which I presume is to allow hanging the gun on a hook (although not to be actually used that way). The gun is rated to be 1800W, and it could hardly be any more than that since that gets you to about 15A, the maximum on most 120VAC single phase power outlets. The gun is specified for 110VAC rather than 120VAC, although that should not be of great importance, and only 60Hz is mentioned, which should only influence fan speed, so I don't know if the gun's fan could be damaged, or work poorly, at 50Hz. The gun can be held, well, gun-like in one hand and aimed at the object to be warmed/heated, and the case & handle design make this mode fairly comfortable, with a good balance and other ergonomics. But the plastic is all hard, with none of the soft-finish we have become accustomed to with many power tools, so this probably makes extended use without wearing gloves somewhat uncomfortable. The other mode is to balance the gun on its rear-end/base, with the nozzle pointing up, so you can use both hands to hold the object to be heated in the air stream above the nozzle. This is a test for many heat guns in my experience, because many have a tendency to tip over, and because this can easily start a fire, they need to be closely watched when used this way. This also can show where the money was saved to get the low cost.....my Milwaukee models use something like a silicon rubber jacketed power cord with high strand count conductors inside, so the power cord is soft and floppy, with minimal stiffness, so the weight and/or stiffness of the power cord, coupled with the greater weight of the gun, make it more stable in this mode. By comparison, this Seekone gun is very light weight, and the power cord, while electrically adequate, is also inexpensively made, and is quite stiff. I found that I had to adjust the position and orientation of the gun until I found a stable place to let it balance while in use, and another other position or rotational orientation on a floor or table would result in the power cord's stiffness pulling on the low mass of the gun, so it would just fall over immediately. My Milwaukee guns have the ends of their handles at the same level as the rear base of the gun's housing when used in vertical mode, and this also helps stabilize the gun. On this Seekone gun, the handle itself cannot be used this way, but they DID include a wire bail that snaps into two holes near the end of the handle. Normally, the bail rests against the back of the handle, but you can flip it to another position where is acts to extend the handle such that it touches the same surface that the gun is balanced on, making it more stable in that direction; this does help to offset the stiffness of the power cord, at least in one direction. The gun comes with four accessories, all of which modify the airflow out of the nozzle: - Concentration nozzle, 2" long, reduces the normal 1-1/2" diameter nozzle down to 7/8" diameter - Concentration nozzle, 2" long, reduces the normal 1-1/2" diameter nozzle down to 1/2" diameter - Reflector nozzle, 2" long, redirects the air from the nozzle to one side (the shovel shaped sheet metal piece is about 1-1/2" wide). The reflector as furnished is fairly flat, but you could potentially bend it to redirect the air differently, or even curl it around something like a dowel to make a looped shape (many other heat guns come with just such a nozzle, best for evenly heating heat shrink tubing around electrical wiring) - Deflector nozzle, 3-1/2" long and 2-1/4" wide, flattens the hot air stream and directs it to one side; this is probably for stripping paint The gun has two controls: - Three position POWER switch, OFF, LOW (I), HIGH (II) - LCD-pushbutton control panel that actually forms the rear base of the gun (the gun rests on the control panel when in vertical mode) The single-sheet User Manual is fairly well illustrated, but the English text does not always make sense, and there are some flat-out incorrect instructions and descriptions. I will now describe what I have learned empirically while using my gun. The LCD display on the control panel is about 1-1/4" x 7/8", and it is not backlit, which can often make it somewhat hard to read. But at this prince point, I am not complaining. Below the LCD are four yellow pushbuttons; FAN + and -, and TEMPERATURE + and -. The control panel works in conjunction with the three position POWER switch, which contrary to what the instructions describe, appears to be actually a range and memory/preset selector, and NOT a fan speed control (on the less expensive version of this gun, that same switch is indeed the combined fan speed control and power switch). You select either LOW (I) or HIGH (II) range with the POWER switch. It seems that the only difference is that in LOW (I), the maximum temperature you can set is 750°F, while in HIGH (II) you can set temperatures up to 1100°F. One in either of those two range settings, you press the FAN + or FAN - buttons to increase or decrease the fan speed, and the speed changes instantly; it then remains where you set it and seems to not change automatically. A circular bar graph on the LCD illustrates where your speed setting is within the possible range of speeds. Then you press the TEMPERATURE + or TEMPERATURE - buttons to select the desired temperature. Normally, the LCD displays the actual measured temperature, but when you are pressing the buttons the LCD changes over to displaying your latest SETTING instead of the actual temperature. Pressing these buttons momentarily increments or decrements the temperature setting by 10°F. Holding down either of these buttons will rapidly change the temperature setting in rapid hundred degree steps. So basically you first hold down a button to quickly get to the nearest 100 degree setpoint, and then momentarily press the same button repeatedly to close in on the desired setpoint by tens; pretty intuitive and fast. After you have not pressed a TEMPERATURE button for a couple seconds, the LCD changes from displaying the setting, and starts showing the actual temperature, and you can see it rapidly increase or decrease until the setpoint is reached, and then the digital circuitry holds it there. It seems quite stable at that point, and you can still freely change the fan speed as desired; if you make a rapid fan speed change, you might see the actual temperature displayed dip for a couple seconds before it stabilizes again. You can then select the other range, e.g. HIGH (II), and make another set of fan speed and temperature settings, and once again the display will then show the gun rapidly adjusting until the desired temperature is reached. You can then change back and forth between the LOW (I) and HIGH (II) ranges, and the gun will remember your settings for that range and quickly adjust to meet them. Again, it seems that the ONLY difference between the two ranges is the maximum possible temperature setpoint. The LCD can be set to display temperature in either Fahrenheit or Celcius (Centigrade). Unintuitively, you press BOTH the FAN + and FAN - buttons at the same time for a few seconds to switch between the two units (it would have been more intuitive to press both TEMPERATURE buttons). The instructions, AND a large label on the gun itself, remind you to always turn the gun off by moving the POWER switch to OFF, after which the digital controller will keep the fan running for about 8 seconds to cool off critical components. You are adjusted to never unplug the gun until this automatic cool down has completed. I note that on the simpler non-digital version of this heat gun, there is no such automatic cool down and no such warning. I wonder of the thing that needs to cool down is actually some part of the solid-state controls, rather than the fan or heating element.... BTW, most heat shrink tubing is polyolefin, and the normal recommended shrink temperature for that is about 200°F, so the LOW (I) range is appropriate, and the fan speed can also be set fairly low as well. Read more