J-B Weld

J-B Weld 2120 Radiator Repair Kit

$17.99

98+ bought in the past month

About this item

  • RADIATORWELD: Our radiator and plastic tank repair kit has all you need for making professional quality, permanent repairs with state of the art components and easy to follow instructions.
  • COUNT ON US: For more than 40 years, our products have earned a loyal following from people who take pride in their work. With each product we innovate, we continue to provide the world's strongest bond for your projects.
  • SIMPLE TO USE: No removal of tank or radiator is required to stop leaks. Easily fix holes up to 3/8" diam. or cracks up to 4" long. Includes epoxy putty, fiberglass cloth, sandpaper, and applicator.
  • VERSATILE & DEPENDABLE: Great for radiators, washer fluid tanks, storage tanks, water tanks, plastics, composites, PVC and more. Professionals, mechanics and avid DIYers know J-B gets the job done.
  • NO PROJECT TOO BIG OR TOO SMALL: We have all the products you need to get the job done right. JB Weld always delivers the legendary performance of the World's Strongest Bond.
$17.99

In Stock

Easy Returns · Return eligibility shown before checkout


How you'll get this item

DeliveryShipping details confirmed at checkout

Fulfillment

Ships fromVentari
Returns
Easy ReturnsReturn eligibility shown before checkout
PaymentsPayment details confirmed at checkout

Currently unavailable
Easy Returns · 30-day window
Technical specifications
manufacturerJBWeld
brandJ-B Weld
modelJ-B Weld 2120 Radiator and Plastic Repair Kit
item_weight1.76 ounces
product_dimensions2 x 4 x 8 inches
item_model_number2120
is_discontinued_by_manufacturerNo
manufacturer_part_number2120
best_sellers_rank#23,006 in Automotive ( See Top 100 in Automotive ) #4 in Radiator Sealers #1,082 in Oils & Fluids
date_first_availableJuly 18, 2016

From the brand

Product detail

Product videos

Product video 1

Customer reviews

4.11,026 ratings
  1. 5100%
  2. 40%
  3. 30%
  4. 20%
  5. 10%

Customers say

Customers find the radiator repair kit to be of good quality, though its functionality receives mixed feedback - while it works well on plastic Ford radiators, many report it doesn't work for radiator repairs.

★★★★★

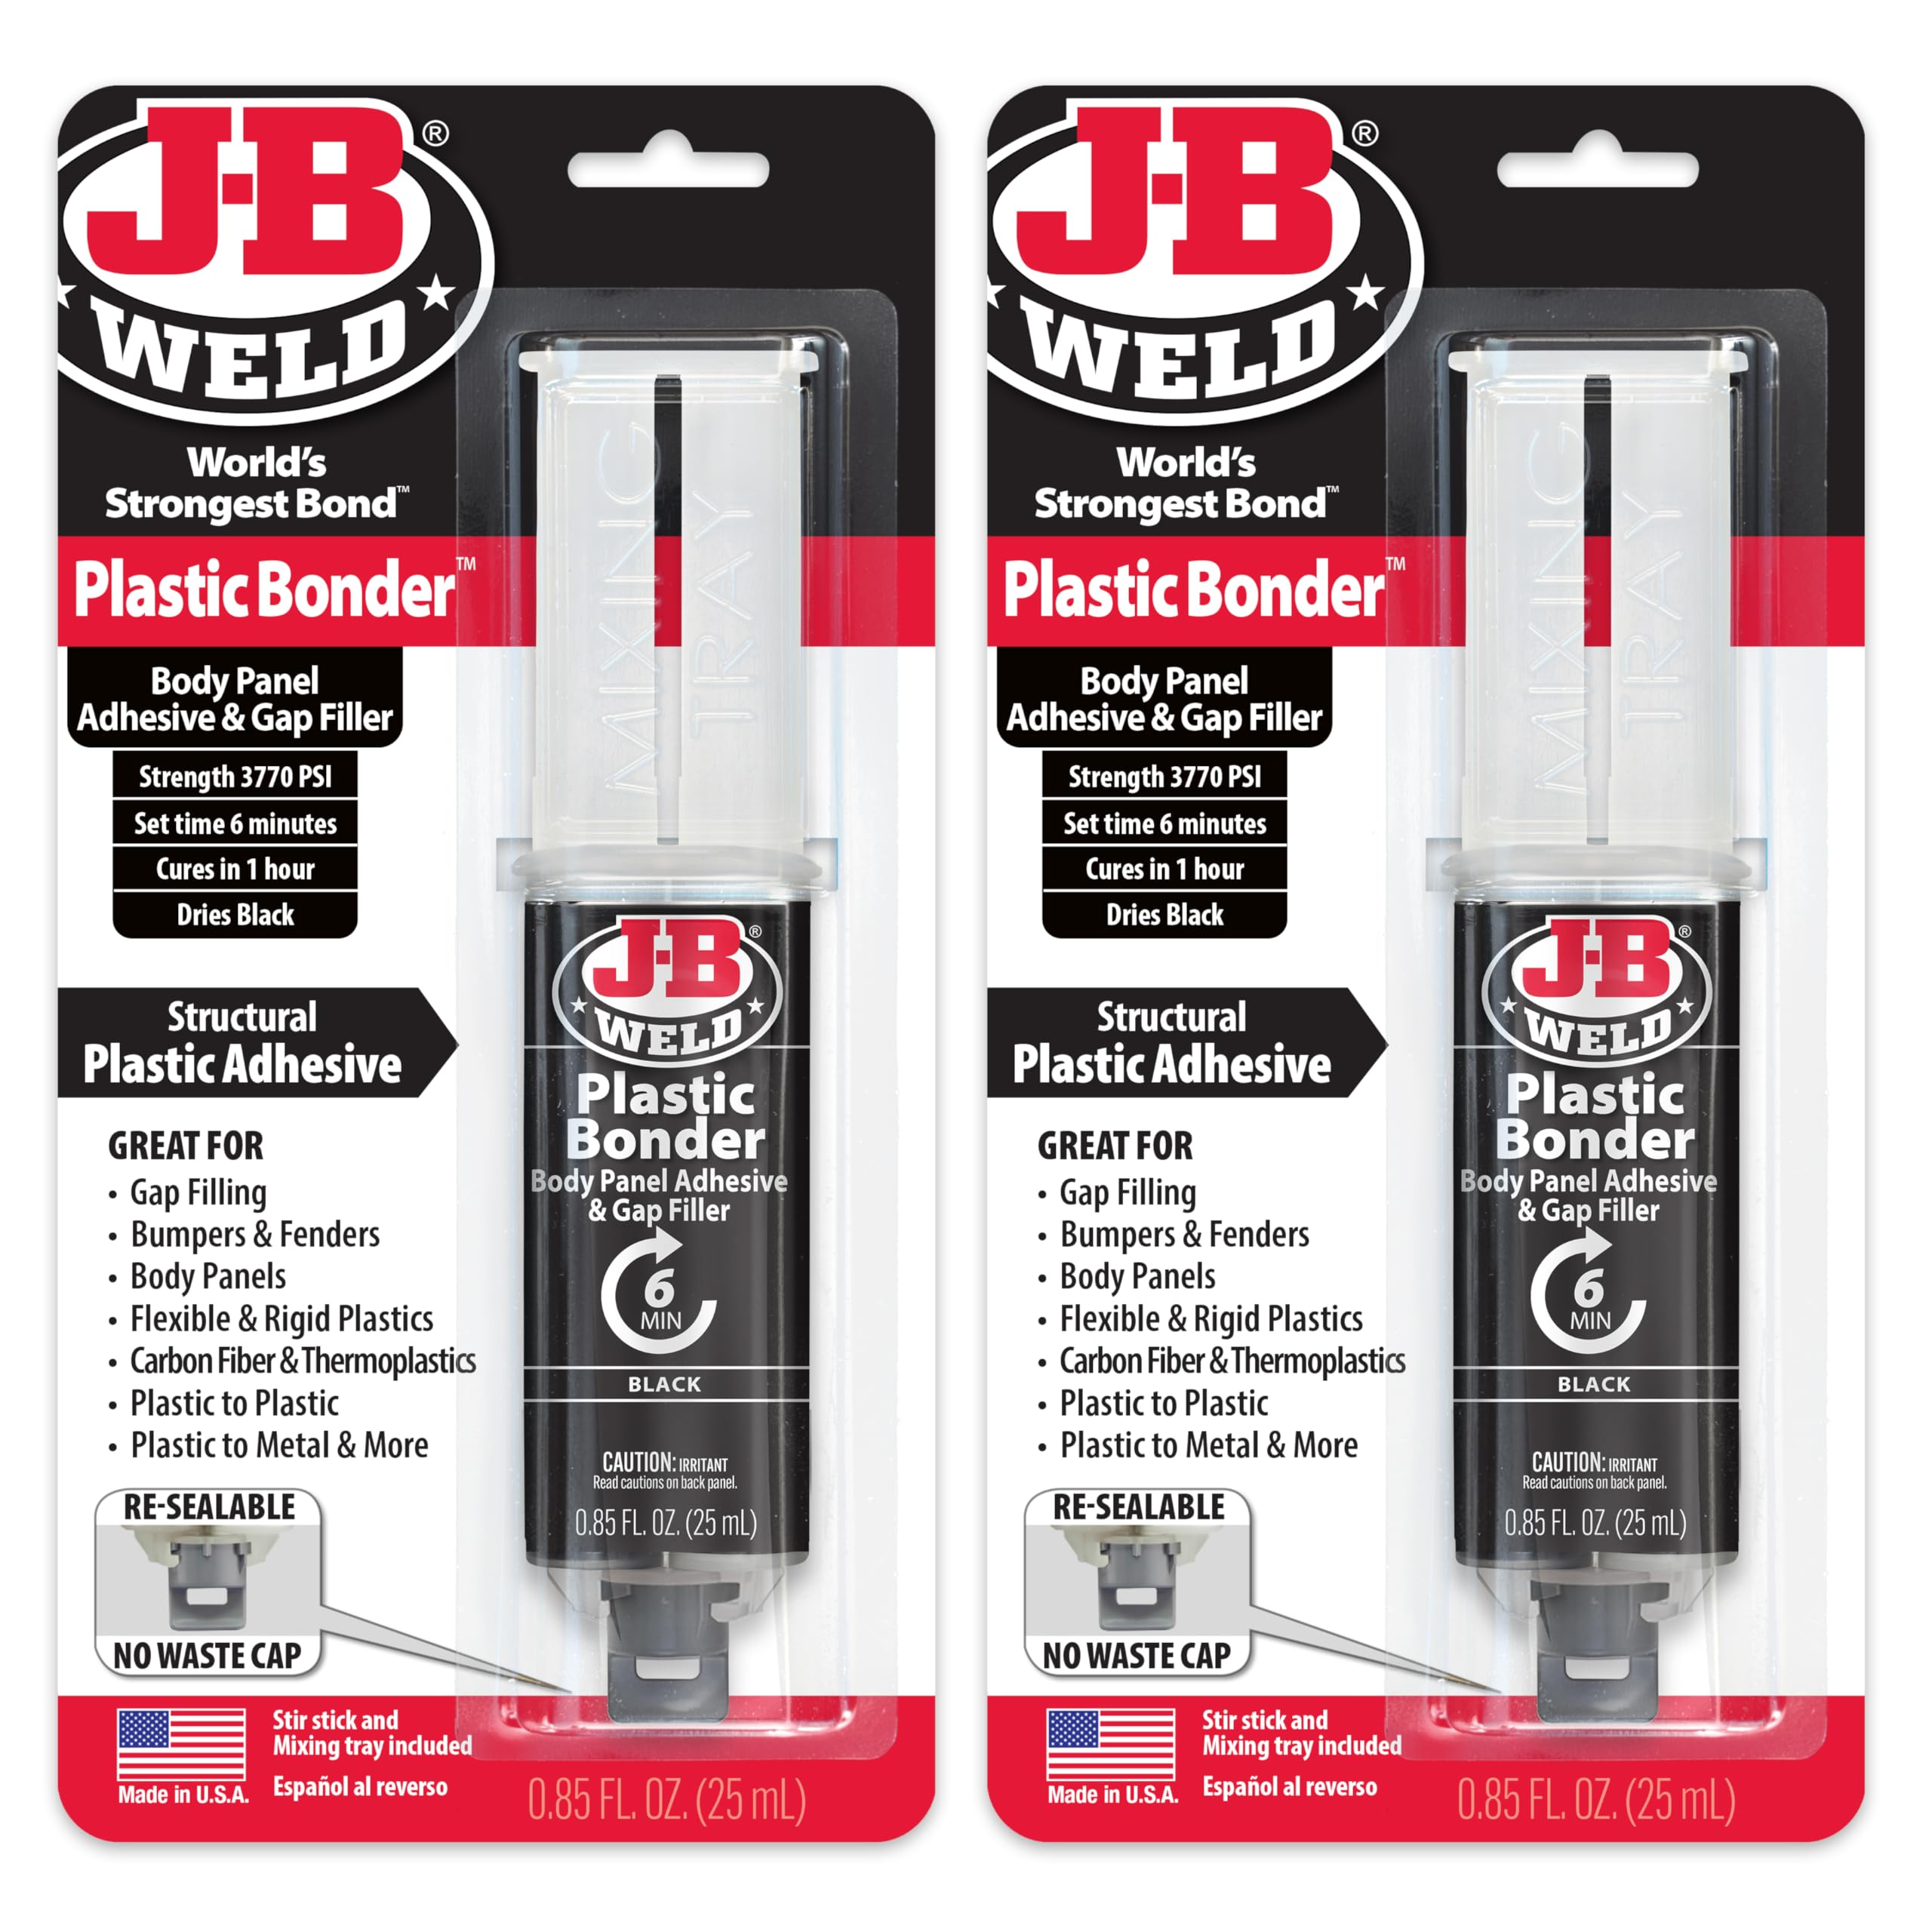
Use only small amounts, for it sets too quickly to do a complete job at once.

Helen LefebvreAugust 17, 2020✓ Verified purchase

It works, if done correctly. Most important is making use of the mix within a minute. I benefitted from reading these reviews, learning how quickly it begins to set and the suggestion to mix only a small amount. I mixed four servings and still have half left over. I realized when working with my first mix, how quickly it sets, that its a setup for failure to mix the full amount of black and clear fluids as instructed in their package, for it's much more adhesive than what can be worked with effectively before it begins to set. Cutting off a small corner of each sealed package, I squeezed out a small amount from each onto a piece of cardboard - no bigger than a dime, keeping them separate from each other. This gave me time to wipe off the package corner and fold it over a couple times to seal it. Kept separate, the chemical action had not begun until I mixed the two with a popsicle stick. Both are quite fluid and spread out when squeeze out, so give them room to spread and not make contact. It's easy enough to see when there are about equal amounts, adding more to one or the other to make them look equal. It's an advantage not to use too much. My cardboard piece was the size of a business card, stiff enough where I could hold it flat, mix and scrape off the stick on the card edge and work that mix into the whole amount. Because one is black, the other clear, it's easy to see and judge how the two mix. Using the brush, I brushed it into the prepared surface, kind of scrubbing it in to invite the paste to mix with the radiator plastic, leveled it off with the brush, applied the precut piece of fiberglass mesh, then brushed a coat of the mix over the fiberglass. By this time, it was becoming obvious the mix was hardening and would no longer be as binding. Knowing I had planned to apply additional coats, I stopped working with it and let it set for about 15 minutes. The brush also set up and was no longer usable, which added to the misrepresentation of the instructions. It's quite fluid when mixed, so if applying a thick coat to a vertical surface, it will drain down, adding to the challenge of keeping it in place, applying the fiberglass and coating that and keeping that covering in place, all before it begins to set. Knowing I had planned on additional coats, I could concentrate on placement. Inspecting that first application after it set, I could see where I could improve upon the coverage and mixed up another serving, applying it with my rubber gloved little finger. Because of how fluid the mix is at the beginning, it kind of self levels, though not applying too much for it to run down. Initial preparation of the plastic tank is critical. I sanded the area, beyond the crack to invite bonding. I had two cracks to fix, one about 3/4" long on the flat surface just below the upper hose connection tube, the other, an inch long on the top of the tube, from the opening coming in. After sanding, I used a wood burning tool - the V tip, to melt the crack line, about 1/16th of an inch deep, then melted the plastic over the crack. When hardened, I sanded that surface to roughen it. I had no engine oil to clean off, so it was just cleaning off the sanding dust with a alcohol moistened lint free rag. My fiberglass application on the round upper radiator tube, created a ridge where the fabric ended. After my first application, I filed that edge to be round for the hose to seal right and sealed that off with my additional finger applied coat. My patches are holding for a week, with no sign of failure, with both looking so well glued in - especially the edges, that they should be a permanent part of the plastic radiator. Read more

★★★★★

Take your time.

Leonard J MooreJuly 7, 2023✓ Verified purchase

I hit a turkey, and it cracked the top of my radiator!!! I cant notice the crack by eye, nor can I feel it with a fingernail.. But it does lose and spurts out coolant.. I' on a fixed income and can't afford a new radiator right now.. We are going on a trip next week, so I have my fingers crossed!! Fist off, I went through the process, laid down the fiberglass cloth and it looks nice!! And not one leak or spot of dampness!! First, carefully cut the 2 bags apart from each other, but do not cut them open!!! Sand sand sand, do a nice job... Clean it and the surrounding area really good... Alcohol, etc.. I used windex.. Cleaned it, dried if.. Then cut and shape your fiberglass cloth to size.. You want plenty of overlap over the crack or hole.. This is getting things ready.. Knead the black bag, unopened.. Mine was quite hard, but loosened up after kneading.. Cut the corners of each bag, about a quarter inch.. Here's the trick!!! Squeeze out just enough to do the job!! And do not squeeze them out on top of each other or let the black pile touch the clear pile... Once they touch, it starts the curing process.. They call for 50-50 of each, black and clear.. I used less clear in the mix.. The clear makes it harden faster.. Know where you're gonna put it before all this and get the right tool to mix and the right tool to spread or apply it. I used an old ins card to smooth and spread and a popsicle stick, to mix the two, together!! Mix the amount you need, and apply, spread it.. Put it in the cracks or holes and spread it fairly smooth.. While still wet and tacky, put the cloth on and quickly press the cloth into the mixture.. Smooth it out with whatever tool your using. Now, the cloth and jb weld should be pretty tacky.. Mix up the rest of the batch, in equal parts and spread it on top of the cloth, and be sure to overlap the cloth and area... Keep working on it neatly till its too stiff to work with.. Less than a min.. I let my repair sit over night, with the radiator cap off and the coolant, below the repair area.. Checked today, and it was hard as a rock.. Topped off the coolant, ran the car in idle, dry as a bone.. Then took it for a ride!!! Perfect so far... Moral of the story, watch out for turkeys!! Plan your repair.. Get your mixer, spreaders, cloth cut to size etc... And prepping of the surface.. JB weld always performs the best, but its up to you, to take your time prepping, follow directions, and have everything you need ready, BEFORE you cut those bags open... The brush that comes with the kit, use it with your last coat... To spread and smooth.. If you use it first it will be junk in 30 seconds.. I will let everyone know how it all holds up.. New post and update.. It has been about 2 weeks now.. No leaks.. None And this was including a 600 mile + trip... It included, high speed, 80+ to hills to traffic jams...! Not a leak or drop.. In the amount of time since using JB, I probably have put about 1000 on, and it works perfectly... Aug.12, 2023. Update.. Many more miles added and no leak, not a drop!! Read more

Recently Viewed

We use optional analytics cookies to understand how visitors use Ventari and improve the experience. This banner controls analytics measurement only. See our Cookie Policy.