Wonderful Machine. See Photos for tips on simple installation (DIY)
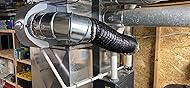
Very pleased with this Whole-Home Humidifier I installed myself without any prior professional experience. That being said, I did spend about 5 hours researching installation techniques as the included directions are both difficult to make sense of as a layperson and also fail to reflect newer construction homes with furnace boards containing dedicated humidifier (labeled HUM) circuits. If you have a newer home, see photos and follow instruction. If your furnace's HUM circuit is 24VAC, then you won't need to use EITHER the included transformer or the recommended relay (an additional $35). When you wire the humidifier (using 18/2 thermostat wire), the humidifier only runs when the furnace fan/blower unit is running. When the home thermostat triggers the furnace to run a cycle, it will automatically trigger the humidifier to run along with the furnace. This is ESSENTIAL in saving TONS of money on unnecessary water usage. If you bought the MANUAL version humidifier (like me), then without paying additionally for the relay accessory the humidifier will run around the clock even when the furnace motor is off, essentially just draining your hot water down your floor drain. WIRING (with newer home construction or recently upgraded furnace) You'll first install get the entire unit installed after cutting LEVELED spaces into HVAC using included templates. It is essential that the unit is installed perfectly leveled to ensure balanced water flow throughout the humidifier unit filter. (1) Then, you'll run an 18/2 Thermostat Wire from the furnace circuit board into the vent where your humidifier unit is hooked up (you'll 18/2 wire will come in either a brown or gray sheath containing two wires; one white, and one red). Use conduit to protect wire if running between two vents, as shown in the attached photos. (2) With the 18/2 from the furnace circuit board to the humidifier, you'll tie-in the WHITE wire directly to one of the 2 yellow wires attached to the humidifier unit. The other end of the white wire will hook up to your HUM circuit on the furnace board using a CLAM adapter specified to your 18ga wire. (3) The red wire from the 18/2 running from the furnace circuit board to the humidifier unit will then tie-in to the screw on the near-side of the included thermostat (hung a minimum of 6" above your humidifier unit. The other end of the red wire will tie-in to your COMMON circuit on your furnace circuit board, labeled with a C. This is your 24VAC. There will likely be 1-2 cables already tied into your (C)Common from your homes thermostat and/or AC, so if you need to butterfly the wires to avoid crowding up the input then do so. (See included picture) (4) You'll then run a new, single red wire (pulled out of the brown/gray sheath) from the other screw point on the thermostat directly to the 2nd yellow wire on the thermostat unit. Simple as that! Hooking it up this way will ensure that your humidifier only pulls hot water when the furnace cycle is actively running after being triggered by your homes thermostat as it calls for more heat. TIPS from the PRO FORUMS I researched: -Avoid using the semi-rigid, extendable and flexible duct pipe when connecting the vent from your humidifier unit to the opposite return/flow vent (see pictures). PROS stated they never use this pipe for humidifiers because moisture can build up in the many grooves which can pose many problems down the road. RIGID Vents also allow for smoother airflow. -It was advised to NEVER use the included adapter for cutting into your copper piping to pull water if you are installing in a home without newer PEX Pipe. They stated these always fail over time and will begin to leak. If you have copper piping, you may need to solder in a T-Joint to run the 1/4" hot water line (this skillset is likely beyond the DIY'er). Bite the bullet and hire a pro, even if it is just for this purpose. -Use COPPER 1/4", and NOT plastic tubing when running from your hot water line (it is further advised to always run hot water through the humidifier) to your humidifier unit. -If you have PEX Pipe, working with Shark Bite joints is a breeze--just make sure you measure the depth of how far the pex pipe needs to be inserted into the Shark Bite valve to ensure proper seal. All in all, this was a lengthy install (took me about 6.5 hours with zero prior experience with HVAC) but the unit is running exactly as I had hoped. After one evening's cycle, humidity in the home is up 4% and I hope to be at the recommended 35% within 3-5 days (it was also recommended to NEVER put your humidifier thermostat above 35%, as this can result in excessive moisture build up in the home and lead to mold issues as well as harm any wood work/cabinets). I paid an additional $100 for materials, and saved myself the $300 installation charge for a pro (this was the low-end of estimates I received). The other perk of the self-install is forcing yourself to learn/understand the unit's functioning, which will assist with ongoing maintenance and troubleshooting if problems arise. Give it a go! Read more